CBX.GridMapping
Copyright (c) 2012, Dean Lunz
deanlunz@createdbyx.com
http://www.createdbyx.com/
All rights reserved.
CBX.GridMapping is a in editor tool for unity that assists you in the creation of worlds that are based around a grid.
NOTE: The current version of this tool does not contain a grid or tile mapping/management system. It is a in-editor creation tool only. A future update will include editor & runtime management API's.
*Temporary Homepage: http://www.createdbyx.com/page/CBXGridMapping.aspx
Google+ page: https://plus.google.com/100290581403134799105
Demonstration video: Getting started
Unity Asset Store: Asset Store
The links to the temporary homepage & Google+ pages are intended to be place holders until I can decide on a company name and logo so I can set up a domain and official homepage for CBX.GridMapping as well as my other projects.
Image tile sets are from Ari Feldman's SpriteLib (Common Public License) and are not included with this package.
http://www.widgetworx.com/widgetworx/portfolio/spritelib.html
Table of Contents
Tile Material Creation Window [ Top ]
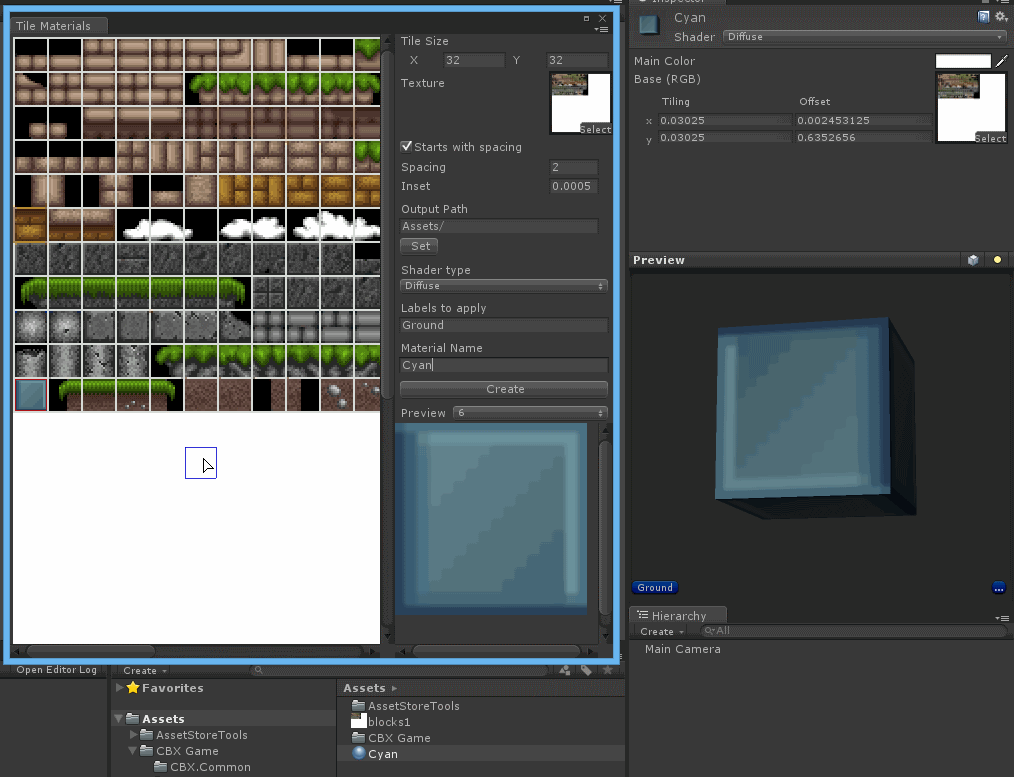
The tile material creation window allows you to create materials for one or more selected tiles.
How to use [ Top ]
- Select a texture containing the tiles you want to create materials for.
- Under 'Tile Size' you can specify the dimensions of the tiles.
- If the tile set texture starts with spacing in the upper left corner then check the 'Starts with spacing' check box.
- Set 'Spacing' to the number of pixels there are between tiles.
- Select a individual tile by left clicking on it or use the left mouse button and drag a selection rectangle.
- Specify an output path where the material will be created or click the 'Set' button to use a select folder dialog.
- Under 'Shader type' Specify a shader type that the material will use.
- Specify any labels you with to be applied to the material in the 'Labels to apply' field.
- Click the 'Create' button to create the material.
How does 'Inset' work? [ Top ]
The 'Inset' field is intended to fix any pixel bleeding issues with your selection. This value is used to scale the selection rectangle inward slightly so that the color from neighboring tiles do not bleed over.
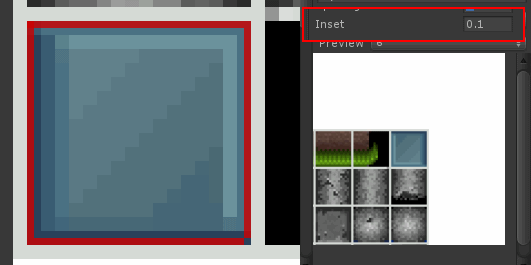
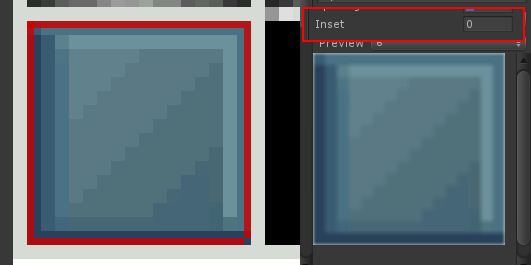
The fallowing 3 images demonstrate how inset works. The tile is surrounded by a two pixel wide border colored in white.
Too large a inset value can cause undesired results. A inset value of 0.1 demonstrates this.
With a inset value of 0.0 the pixels from the white border around the tile bleed over slightly.
With a inset value of 0.0005 the pixels from the white border no longer bleed over.
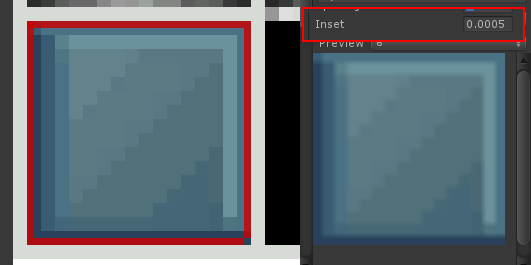
The Default value of the inset field is 0.0005 as it is generally the best all round value to use.
Grid Mapping [ Top ]
To add a grid map to the scene click "Tools->Tile Mapping->Create New Grid Map"

Alternatively you can create a new game object and add the 'Grid Map' MonoBehavior.
Changing map properties [ Top ]
When the map is selected it will show a series of properties in the inspector window.
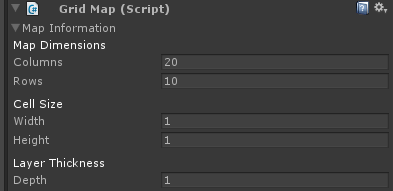
- 'Map Dimensions' - Allows you to specify size of the map in Columns & Rows.
- 'Cell Size' - Allows you to specify the size of each cell.
- 'Layer Thickness' - Defines how far the layers are separated from each other.
Map Layers [ Top ]

You can set the number of map layers by changing the value of the 'Layer Count' field. There must be a minimum of one layer.
To change the name of a layer click the button for the layer and type a layer name in the 'Layers' field.
Clicking on a layer makes it the active layer and drawing on the map will draw onto the selected layer.
Drawing Helpers [ Top ]

There are three drawing helpers that assist in the creation of maps.
- 'Guidelines' - If checked will draw a line extending from the current marker position. Lines are drawn along the Column, Row, & number of Layers.
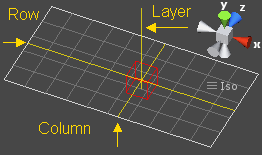
- 'Grid' - If checked will draw a grid for the currently selected layer and show the Column & Rows.
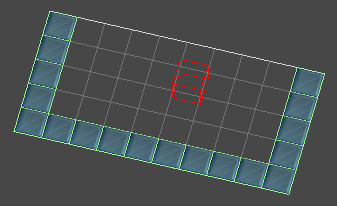
- 'Auto Scale' - If checked prefabs that are drawn will automatically be scaled to fit within the maps 'Cell Size'.
How does 'Auto Scale' work?
When 'Auto Scale' is checked the system only factors in the X & Z size of the prefab when determining how much to scale it. This can lead to issues if the prefab you are drawing is very tall along the Y axis or taller then the maps 'Layer Thickness' value.
Selecting prefabs [ Top ]
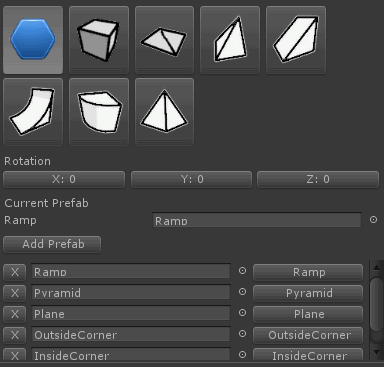
Before you begin drawing you must select a prefab to use.
Selecting the blue hexagon  allows you to select a prefab that is not available in the quick prefab selection grid.
To select a prefab click the prefab selection field under 'Current Prefab'. A list of recently selected prefabs will appear under the 'Add Prefab' button.
To remove a prefab from the recently selected prefab list click the 'X' button to the left. To select a recently used prefab and use it for drawing click the button to the right to make it the current prefab.
If you want to add additional slots to the recently used prefabs list you can click the 'Add Prefab' button and it will add a new empty entry to the list.
Selecting a material [ Top ]
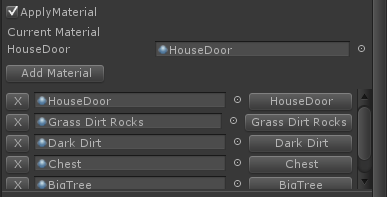
When drawing a prefab from the quick prefab selection list you can also choose a material to be applied to the prefab when it is drawn. The material will only be applied if the 'Apply Material' check box is checked. The 'Current Material' does not get applied to prefabs if you are drawing with the blue hexagon  .
.
To select a material click the material selection field under 'Current Material'. A list of recently selected material will appear under the 'Add Material' button.
To remove a material from the recently selected material list click the 'X' button to the left. To select a recently used material and use it for drawing click the button to the right to make it the current material .
If you want to add additional slots to the recently used material list you can click the 'Add Material' button and it will add a new empty entry to the list.
Changing rotation [ Top ]

If the prefab you are drawing is not oriented properly you can click one of the rotation buttons The three buttons buttons corrispond to the X, Y, Z rotation.
When you click the button a grid of preset rotation values will appear.
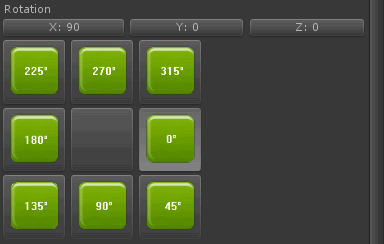
Click a rotation value from the grid to set the rotation. To cancel selection and close the selection grid you can click the center square or you can click the rotation button again.
Rotation grids are color coded to match the color of unity's axis. Red for the X axis, green for the Y axis, and blue for the Z axis.
Customizing the prefab list [ Top ]
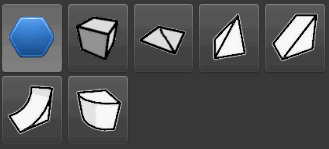
You can customize the quick prefab selction grid by making changes to the 'PrefabTypes.txt' file located in the 'CBX Game/Editor/Resources' folder. Read more about Resource folders in the Unity documentation here.
// Source asset, texture icon, name

// separator ,
Prefabs/Plane, Textures/2D 2 Poly Plane, Plane
Prefabs/CornerRamp, Textures/CornerRamp, CornerRamp
Prefabs/Ramp, Textures/Ramp, Ramp
Prefabs/InsideCorner, Textures/InsideCorner, InsideCorner
Prefabs/OutsideCorner, Textures/OutsideCorner, OutsideCorner
Prefabs/Pyramid, Textures/Pyramid, Pyramid
Each line defines a comma separated entry.
<PrefabResource>, <TetureResource>, <Name>
- '<PrefabResource>' - A resources folder path to a prefab asset without the file extension.
- '<TextureResource>' - A resources folder path to a texture asset without the file extension.
- '<Name>' - Defines the name that the prefab will have when drawing.
Lines that begin with // are treated as coments and ignored. One exception to this are lines that start with '// separator'.
Lines that start with '// separator' are used to define how subsequent entries are parsed. Take the following example ...
// separator ,
Prefabs/Plane, Textures/2D 2 Poly Plane, Plane
Prefabs/CornerRamp, Textures/CornerRamp, CornerRamp
// separator $
Prefabs/Ramp $ Textures/Ramp $ Ramp
Prefabs/InsideCorner $ Textures/InsideCorner $ InsideCorner
// separator ***
Prefabs/OutsideCorner *** Textures/OutsideCorner *** OutsideCorner
Prefabs/Pyramid *** Textures/Pyramid *** Pyramid
In the above example '// separator ,' defines that subsequent lines should be processed using a comma ',' character to separate the prefab, texture and name values. The two following entries Plane and CornerRamp get processed using a comma ',' as the separator.
Then '// separator $' is used to change the separator character from a comma ',' to a dollar sign '$' and the entries for Ramp and InsideCorner are processed using the dollar sign as a separator.
'// separator ***' Is then defined and used as the separator for OutsideCorner and Pyramid entries.
The true purpose of the '// separator' line is to accommodate any possible prefab name by allowing the user to define what separator string will be used to process entries.
How to draw prefabs [ Top ]
Drawing prefabs is as simple as selecting the map in the hierarchy and using the left mouse button to draw the current prefab. Drag the left mouse button to continuously draw prefabs. Use the right mouse button to erase prefabs.
Understanding the naming convention [ Top ]

Prefabs that are drawn are added as children under the map. Each part of the name is separated by an underscore '_'. The name of the prefab is structured as follows...
- Prefab name.
- Underscore separator.
- 'l' character indicating the layer followed by a number indicating what layer the prefab belongs to.
- Underscore separator.
- 'c' character indicating the column followed by a number indicating what column the prefab belongs to.
- Underscore separator.
- 'r' character indicating the row followed by a number indicating what row the prefab belongs to.
The purpose of this naming convention is to allow for easy identification of children under the map object. With this structured naming convention 3rd party tools can be written to make sense of the prefabs that make up the map.
Known Issues [ Top ]
- Clicking the rotation buttons to show the preset rotations can lead to the rotations grid not fully displayed requiring the user to scroll down the inspector window to fully see it. This will be addressed in a future workflow update.
Future list of features [ Top ]
For the purposes of transparency here are a list of features that will be coming in subsequent updates listed in no particular order.
For an up to date list visit the homepage links provided here.
- need ability to specify in settings weather user need to hold alt ctrl or shift to draw and erase
- CBX.GridMapping need feature to highlight grid cell prefabs that are completely surrounded by other prefabs. and the option to optimize the map by removing them etc
- Need to replace all of the BuildInTools with console commands so they are reusable and callable from anything BuildInTools become wrappers for the console functionality
- need Flood fill, draw rectangle type tools for Grid mapping
- ability to show all layers where each layer had a grid drawn for it
- ability to hide and show individual layers
- ability to change a layer thickness or offset for each individual layer
- ability to prevent the guideline from drawing a layer guideline
- ability to quickly snap rotate the view when editing so u can change your perspective make this a quick tools feature separate from grid mapping find the point on the layer where the view is focused on and rotate around that point snap rotations around 45 degrees but have setting so users can change the 45 degrees
- need ability to specify if specific parts for grid mapping are visible in the inspector like the layers or just the prefab tools etc.
- need ability to set weather drawing prefabs will be placed mid center like they do now or weather they are placed on top of the layer so the bottom y values are all lined up along the layer depth. also need a setting for this.
- show what row & column number the marker is over in scene view as well as where it's placed in scene view
- for grid mapping prefabs you should have mesh generation ones as well as actual prefab *.fbx ones of the user does not with to take advantage of mesh generation.
- settings needs a reset to defaults button to reset settings to there factory defaults
- Need an gui editor for the prefabs list so users don't have to edit by hand
- Should use multiple prefab list files so they can be bundled together and included with prefabs for distribution as a package
- Recently used prefab list and recently used materials list should not show the name but rather just 'select'
- recently used prefabs and material lists need a setting to say weather or not to show the object selection field or weather to just show a button.
- settings for setting the max number of items that a recently used list can contain.
- tile material creation window needs setting in settings dialog for 'As list' check box as well as default output path etc
- drawing with blue hexagon you should also be able to draw with currently selected material
- need to localize all strings for grid mapping
- have settings to specify the max height of the list of rect materials or prefabs
- CBXEditorHelpers.toolBarButtonSize need to be replaced with a setting in xml file
- grid mapping could have a viewport like selecting a camera that allows clicking to move the view to a position on the map. Think starcraft mini map click to see that part of map
- Tile materials creation windows needs ability to ask when overriding if user wants to replace materials in scene with the material that is to be overwritten otherwise material links will be broken
- Create an error reporting tool for your code for auto submission to a website etc.
- Image to mesh tool converts pixel art into a mesh
- Full setting customizability for changing grid & guideline colors etc
- Categorized quick prefab selection
- Additional prefab shapes for 2D and 3D
- Editor & runtime API's
- Prefab creation via select a rectangle of blocks and convert to prefab
- Isolation of an area to make a blocks easier to edit
- Ability to edit along different axis. Currently it only supports X/Z axis editing with layers extending into the Y plane.
- Drawing rules so that surrounding prefabs will be automatically updated
- come up with a way of organizing materials and selecting them other then having to use unity asset selection window. selecting assets with unity is too slow
- tile material creation needs ability to create rotated materials